Why Docker Is Essential for Shopware 6 Development
Anyone who wants to professionally operate or develop a Shopware 6 store today cannot avoid Docker. The days of XAMPP or MAMP are over. Why? Because modern e-commerce systems have complex dependencies - from Elasticsearch to Redis to message queues. Docker ensures these dependencies work identically across all environments.
But in 2025, it's about more than just getting the shop "running." We are in the age of AI integration. If you plan to use the Shopware AI Copilot or implement your own AI-powered product consultants, you need an environment that reacts exactly like your live server. Testing AI features locally that might behave differently in production is a recipe for disaster.
In this guide, we close the gap that most tutorials leave open: We show you not only how to install Shopware, but how to build a future-proof, AI-ready development setup. We use the best of both worlds: German engineering excellence from [Dockware](https://dockware.io) for development and the stability of official images for production.
Part 1: Strategy - Dockware vs. Official Image
Before we start typing commands, we need to make a strategic decision. In the German Shopware community, there are two dominant approaches. Many beginners are confused: "Should I use the image from Shopware or the one from dasistweb?" According to Shopware's official documentation, both options serve different purposes in the development lifecycle.
Here is the clear answer for 2025:
The Comparison: Development vs. Production Images
| Feature | Dockware (Recommended for Dev) | Official Shopware Image (Recommended for Prod) |
|---|---|---|
| Focus | Maximum developer-friendliness ("Ready in seconds") | Maximum security & performance |
| Setup Speed | Instant (Pre-installed Shopware) | Slow (Build process required) |
| Root Access | Yes (sudo possible, full control) | No (Locked down for security) |
| Included Tools | Adminer, Mailcatcher, Xdebug, PimpMyLog | None (Clean Image) |
| AI Testing | Perfect for testing plugins & API calls | Optimized for traffic handling |
| Use Case | Local development, feature testing, debugging | Production deployment, live traffic |
Our recommendation: Use Dockware for your local machine. It takes away the painful configuration of PHP, Node.js, and databases and delivers tools like Xdebug right out of the box. When you go live, switch to the official image. This approach aligns with AI-readiness best practices for modern e-commerce development.
Use Dockware for rapid prototyping, plugin development, and AI feature testing with pre-installed debugging tools
Validate AI integrations, API connections, and performance in a production-mirror environment
Create a clean production image using official Shopware Docker base with your custom code
Deploy hardened, read-only container optimized for security and high-traffic performance
Part 2: Prerequisites & Preparation (2025 Checklist)
For the installation to run smoothly, your host system must be prepared. Shopware 6.6+ has significantly raised the system requirements. According to Shopware's system requirements documentation, these specifications ensure optimal performance for modern features.
1. Hardware & OS Requirements
- RAM: Minimum 8 GB, preferably 16 GB (Docker is hungry for resources)
- Storage: SSD is mandatory. Plan for at least 10 GB for containers & images
- CPU: Multi-core processor recommended for parallel build processes
2. Software Stack Installation
Make sure the following tools are installed:
- Git: For version control and cloning repositories
- Docker Engine: Platform-specific installation required
- For Windows: Docker Desktop with WSL2 backend (mandatory!) - as detailed in the GitHub WSL documentation
- For Mac: OrbStack (strongly recommended over Docker Desktop, see Performance section)
- For Linux: Native Docker Engine installation
3. Shopware 6.6+ Requirements for AI Features
If you want to use the latest Shopware AI features, install Shopware 6.6 or higher. Your Docker container must provide the following versions (Dockware handles this automatically for you):
- PHP: 8.2 or 8.3 - required for modern AI libraries and performance improvements
- Node.js: Version 20 (LTS) - essential for building the Storefront/Administration
- MariaDB: 10.11+ - provides improved JSON handling for AI data structures
- Composer: 2.x for dependency management
Part 3: Step-by-Step Installation (The Dev Way)
We are now setting up a local environment that is powerful enough to test AI integrations, but simple enough to start in 5 minutes. This setup forms the foundation for implementing AI-powered sales consultants and other advanced features.
Option A: The 3-Minute Quick-Start (Docker Run)
If you just want to quickly test Shopware ("Playground"), use this command. It starts a temporary container that deletes itself when stopped (`--rm`). This is based on the official Dockware documentation.
```bash # Starts Shopware 6.6.x with PHP 8.3 docker run --rm -p 80:80 dockware/play:latest ```
Note: As soon as you stop this container, all data is gone! This is perfect for quick demos or testing specific features without committing to a full setup.
Option B: The Professional Setup (Docker Compose)
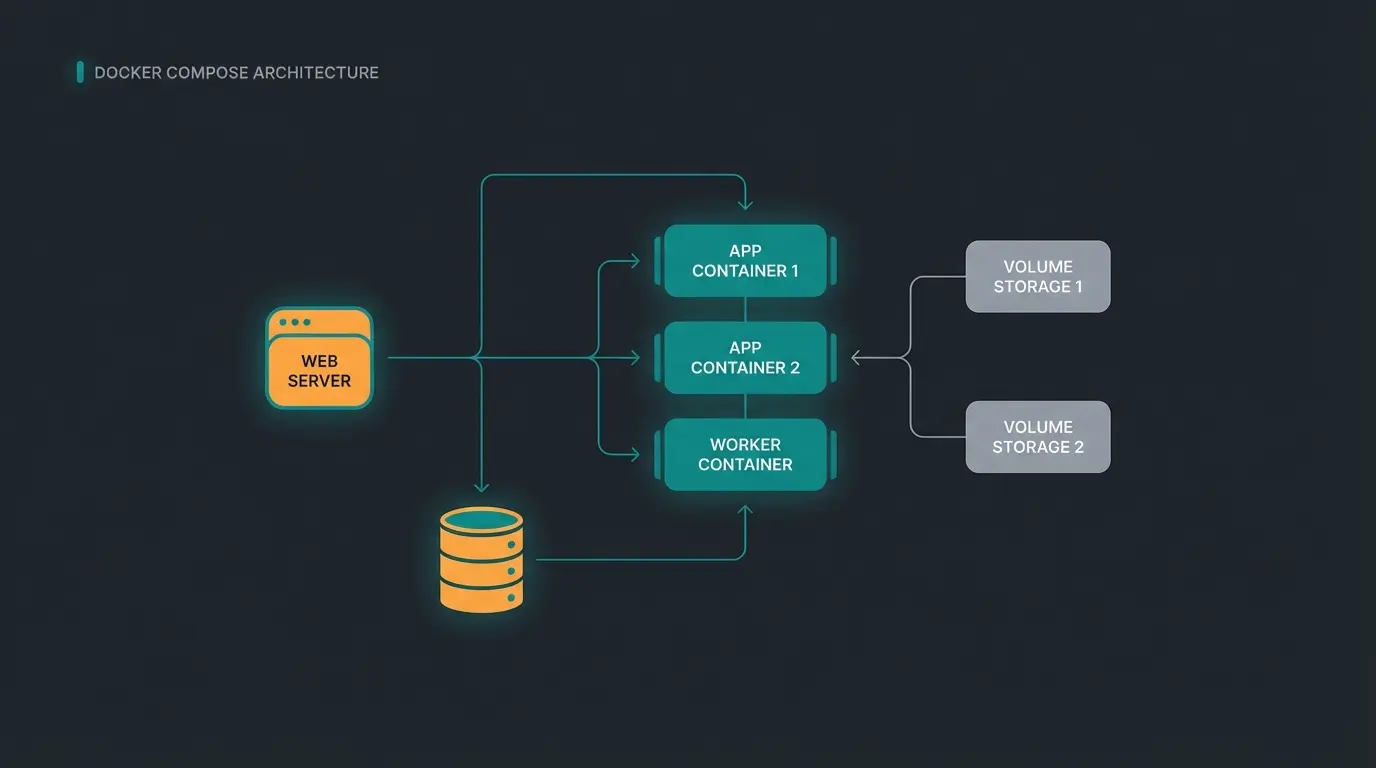
For real work, we need persistence. We create a `docker-compose.yml`. This file is the blueprint of your infrastructure. According to Medium's Docker best practices, this approach provides the flexibility needed for serious development.
Create a folder `my-shop` and inside it a file `docker-compose.yml` with the following content:
```yaml version: "3" services: shopware: # We use the 'dev' image for full flexibility image: dockware/dev:latest container_name: shopware_ai_ready ports: - "80:80" # Web server - "3306:3306" # Database access from outside - "22:22" # SSH - "8888:8888" # Adminer (Database GUI) - "8025:8025" # Mailhog (Email Catching) volumes: # IMPORTANT: Data persistence - "./src:/var/www/html" - "db_volume:/var/lib/mysql" environment: # Configuration for Shopware 6.6+ - PHP_VERSION=8.3 - XDEBUG_ENABLED=1 networks: - web volumes: db_volume: networks: web: external: false ```
Start the container: Open your terminal in the folder and execute:
```bash docker-compose up -d ```
Understanding the Configuration
- Image: We load `dockware/dev`, which already contains Apache, PHP, MySQL, and Node.js - everything you need for Shopware development
- Ports: We open port 80 for the shop, but also ports for database tools and mail testing - essential for debugging AI integrations
- Volumes: The folder `./src` on your computer is synchronized with the shop folder in the container. This means: You edit files locally in your IDE (e.g., PHPStorm), and the changes are immediately effective in the container
Part 4: Advanced Configuration & AI-Readiness
Your shop is now running at `http://localhost`. But to make it "smart," we need to go deeper. This section covers the configuration needed for AI product consultation integration and advanced debugging scenarios.
1. Database Access & Adminer
For debugging AI data (e.g., vector data for search, recommendation logs), you often need to look directly into the database.
- Navigate to `http://localhost:8888`
- Server: `localhost` (or `db`, depending on internal routing)
- User: `root`
- Password: `root` (Default for Dockware)
2. Email Testing (Mailhog/Mailpit)
When your AI consultant should send emails to customers (e.g., "Here is your product recommendation"), these must not go to real customers during testing. AI eliminates waiting times in customer service, but only if your email flows work correctly.
- Dockware intercepts all emails automatically
- Check these under `http://localhost:8025`
- All transactional emails, including AI-generated recommendations, appear here
3. Preparing AI Integration (The Consultant Approach)
For external services (like OpenAI or your own Python-AI) to communicate with your local shop, two things must be ensured. This preparation is essential for implementing KI E-Commerce solutions:
A. API Access Configuration: Create a new API key in the Shopware Admin (`http://localhost/admin`) under Settings > System > Integrations. Your AI service needs this to read product data, customer interactions, and generate personalized recommendations.
B. Networking for AI Services: If you have a separate Docker container for your AI service (e.g., a Python script), add it to the `docker-compose.yml` so that both are in the same network:
```yaml ai-service: image: my-python-ai-bot:latest environment: - SHOPWARE_API_URL=http://shopware:80 # Internal Docker communication networks: - web ```
OrbStack vs Docker Desktop on macOS for volume-mounted operations
With OrbStack compared to 10-15s with traditional Docker Desktop
Idle CPU usage improvement with optimized Docker alternatives
Consistent behavior between dev and prod environments
Part 5: Performance Optimization (Mac, Windows, Linux)
A slow shop is no fun. This is where most Docker setups fail, and understanding these optimizations is crucial for AI-readiness testing.
The Mac Problem & Solution: OrbStack
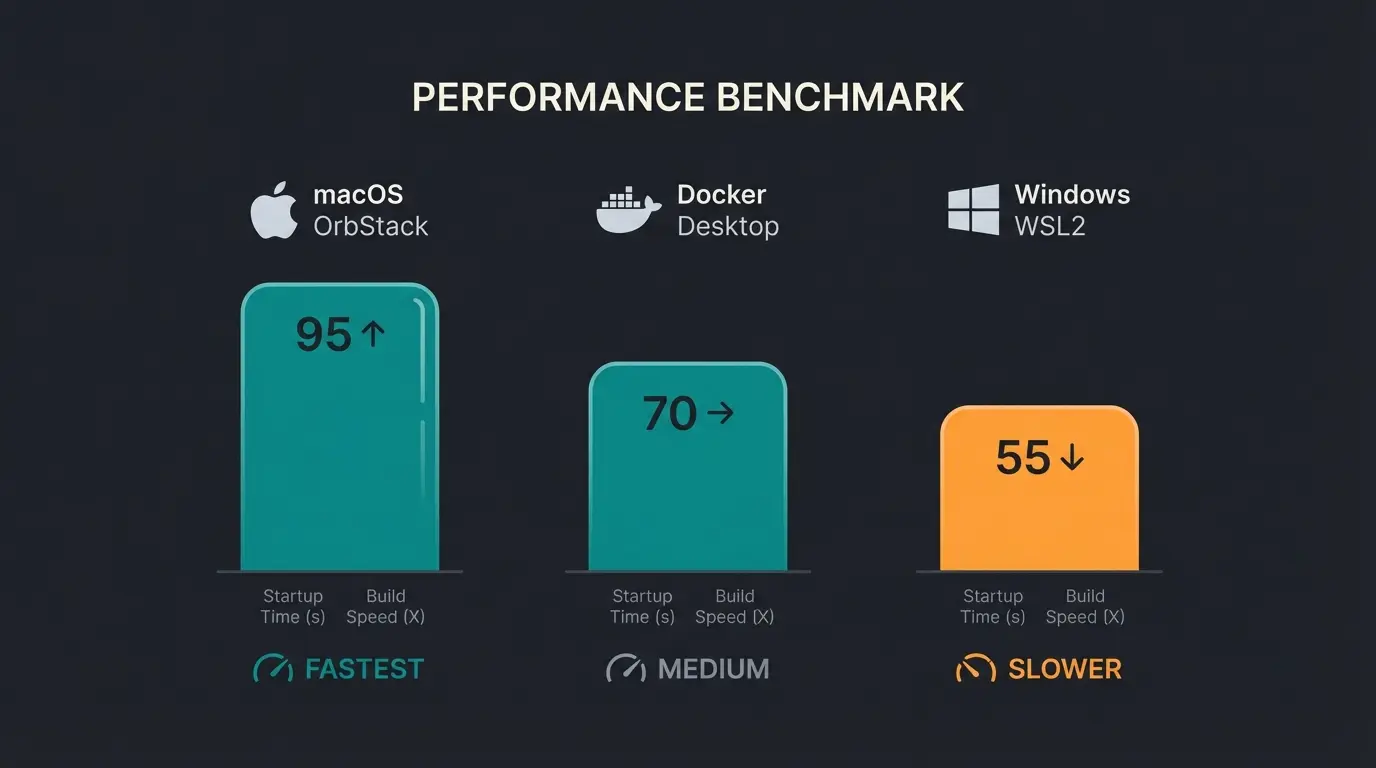
Docker on macOS has been a performance nightmare for years due to the slow file system (mounting). According to WPRiders performance analysis, this significantly impacts development productivity.
The 2025 Solution: Use OrbStack.
- Why? OrbStack is a "drop-in" alternative to Docker Desktop. It is up to 10x faster for file operations, consumes hardly any CPU when idle, and starts in 2 seconds
- Installation: `brew install orbstack`
- Configuration: None needed. It just works. You don't need to change your `docker-compose.yml`
Alternative (if Docker Desktop is mandatory): Enable Mutagen or "VirtioFS" in Docker Desktop settings to speed up synchronization. The Docker documentation and DDEV guides provide detailed configuration instructions.
Windows: WSL2 Is Mandatory
On Windows, you must never run Docker directly on the NTFS file system. According to 4sysops analysis, this causes severe performance degradation.
- Install WSL2 (Windows Subsystem for Linux)
- Clone your project within the Linux environment (e.g., `\\wsl$\Ubuntu\home\user\project`)
- Run Docker Desktop in WSL2 mode
This brings near-native Linux performance. Community discussions on Reddit confirm significant speed improvements with this approach.
Your Shopware Docker environment is the perfect foundation for AI-powered product consultation. See how our AI Product Consultant integrates seamlessly and starts converting browsers into buyers.
Start Free AI TrialPart 6: Troubleshooting Common Docker Errors
Here are the problems we encounter most frequently in agency practice. These AI integration tips will save you hours of debugging time.
Port Conflicts and Resolution
Problem: "Port 80 is already in use" Cause: Another service (Skype, Apache, another Docker container) is blocking the web port. Solution: Change the port in `docker-compose.yml` to `8000:80`. The shop is then accessible at `http://localhost:8000`.
Database Connection Issues
Problem: "MySQL Connection Refused" Cause: The Shopware container has started, but the database is not yet ready. Solution: Wait 10-20 seconds. Dockware has scripts that initialize MySQL. Check the logs with `docker logs shopware_ai_ready`.
Extreme Slowness Diagnosis
Problem: Shopware is extremely slow
- Are you using Mac? → Switch to OrbStack immediately
- Are you using Windows? → Is the data in the WSL2 file system?
- Have you enabled `XDEBUG`? → This slows down PHP massively. Disable it in `docker-compose.yml` (`XDEBUG_ENABLED=0`) when you don't need it
Part 7: From Local to Live (Production Deployment)
You have developed your shop locally and tested your AI features. How do you go live? This transition is critical for maintaining the AI-powered sales intelligence you've built.
The correct workflow:
- Build: Use the official `shopware/docker` image for your build process (CI/CD Pipeline)
- Artifact: Create your own Docker image that copies your code (plugins, theme) into the official Shopware image
- Deploy: Push this "clean" image to your server or cloud (e.g., Kubernetes)
According to Shopware's production documentation, the official image is "hardened": It runs without root privileges, is read-only, and is optimized for performance under load.
Architecture: How Docker Enables AI Integration
Understanding the architecture helps you see why Docker is essential for AI features. When comparing platforms like Shopware vs Shopify, Docker's flexibility for custom AI integrations is a major advantage.
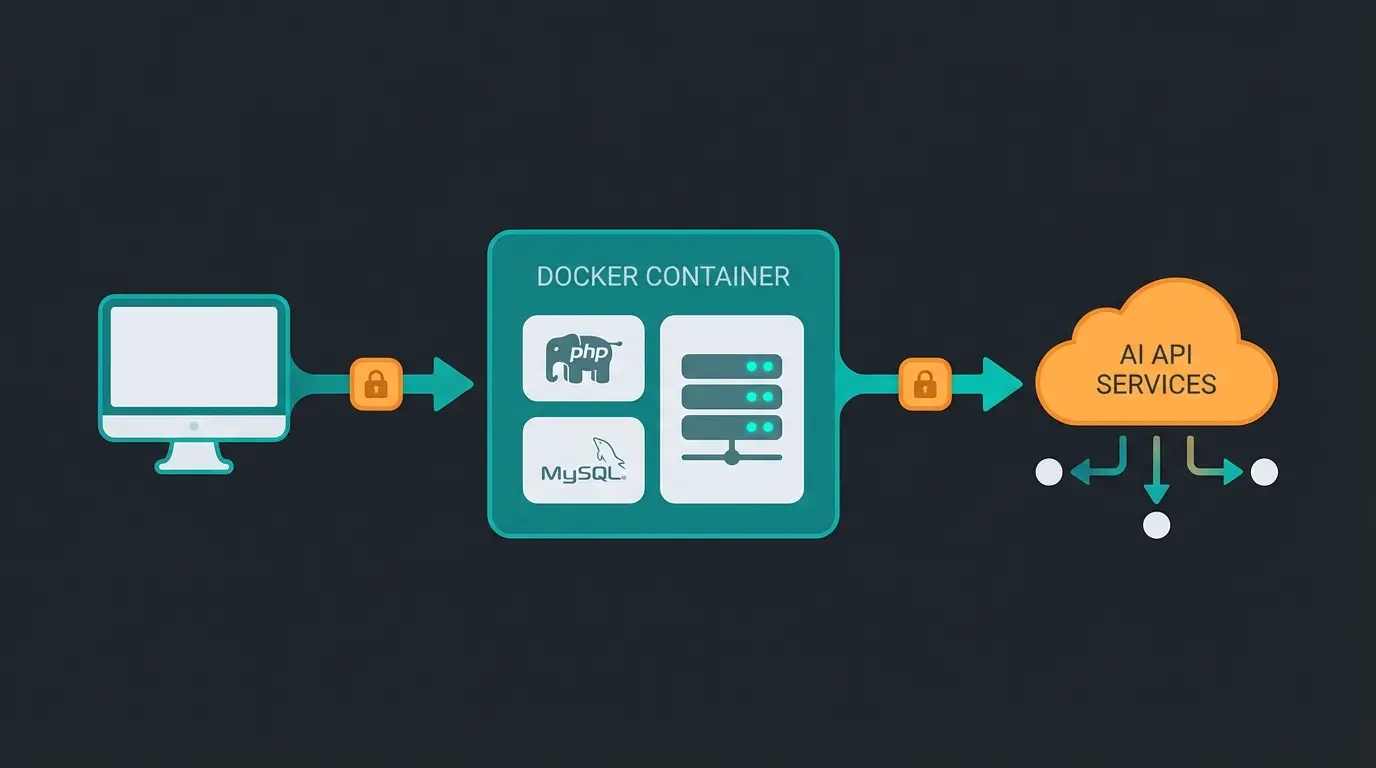
The Docker architecture creates an isolated environment where your Shopware installation runs consistently while maintaining secure connections to external AI services. Your local development container mirrors production exactly, ensuring that AI Product Consultation features work identically in both environments.
Frequently Asked Questions
The most common cause is file system mounting overhead. On macOS, switch from Docker Desktop to OrbStack for up to 10x faster file operations. On Windows, ensure your project files are stored within the WSL2 file system (not on NTFS). Also check if Xdebug is enabled - it significantly slows PHP execution. Disable it with XDEBUG_ENABLED=0 when not actively debugging.
Yes, absolutely. Docker makes this easy by using different port mappings. Run your Shopware 6 container on port 80 and Shopware 5 on port 8080 (or any available port). Just modify the port mapping in your docker-compose.yml: '8080:80' for the second container.
When both services run in Docker containers, use the internal Docker network. Your AI service should connect to 'http://shopware:80' (using the container service name) rather than 'localhost'. Add both containers to the same Docker network in your docker-compose.yml for reliable communication.
Dockware 'play' is a ready-to-run image with Shopware pre-installed - perfect for quick testing. Dockware 'dev' includes development tools like Xdebug, Adminer, and Mailcatcher without pre-installed Shopware - ideal for serious development. Dockware 'essentials' is a minimal base image for building custom configurations.
While not technically mandatory, Docker is strongly recommended. AI features require consistent environments for reliable testing. Docker ensures your local setup mirrors production exactly, preventing 'works on my machine' issues when AI-powered features behave differently after deployment.
Conclusion: Your Foundation for Future E-Commerce
With this Docker setup, you have done more than just install a shop. You have created a professional development environment that is:
- Consistent - thanks to Docker containerization, your environment works identically everywhere
- Fast - thanks to OrbStack on macOS or WSL2 on Windows
- Ready for complex integrations like AI services, product consultants, and intelligent search
Such a setup is the foundation for not only building standard shops but testing real innovations. The techniques covered here align with modern AI integration best practices used by leading e-commerce agencies.
Your Next Step: Now that your shop is running, don't settle for basic product search and generic customer interactions. The infrastructure you've built is perfectly suited for AI-enhanced experiences that convert browsers into buyers.
Your Docker environment is AI-ready. Discover how our AI Product Consultant integrates in minutes and increases your conversion rate through intelligent, personalized product advice - just like having your best sales expert available 24/7.
See AI Consultant Demo